一、前言
前面两篇文章Nexus - Sonatype Nexus搭建maven私服、 Nexus - Gradle打包上传至Sonatype Nexus都是介绍maven相关的仓库, 下载应用程序相关的依赖包,上传应用程序的构建产物。
本篇文章将介绍docker相关的仓库,下载docker镜像,上传自己构建的应用程序的docker镜像。 方便持续集成时候,能够直接从ci上获取应用程序镜像,进行部署。
二、搭建Nexus docker仓库
下面我们会:
- 创建一个docker proxy仓库,用于代理Docker Hub
- 创建一个docker hosted仓库,用于管理我们自己构建的镜像
- 创建一个docker group仓库,用于对上面两个仓库暴露统一的URL。
与此同时,我们会创建三个blob:docker-hub-blob、docker-local-blob、docker-blob分别对应上面的docker proxy、 docker hosted、docker group仓库。(创建blob的步骤略)
1. 创建docker proxy仓库
1.1 各项配置
-
Repository Connectors

-
Docker Registry API Support

Generally V1 support is only needed for repository groups that will be used for command line-based searches, when any client side tools in use require V1 or when a upstream proxy repository requires V1. If you are unsure if your setup uses these or V1, it is recommended to activate V1 support as there should be no harm if it is not needed.
此处Enable v1之后,会允许使用V1作为V2的fallback。将来,V2会替代V1,但是有些功能(比如docker search) 在V2中暂时还没实现。如果你不确定是否要enable V1,那么推荐你激活这个选项,因为激活这个选项不会造成任何危害,但是某些情况下, 不激活反而会造成一些错误。
-
Proxy

-
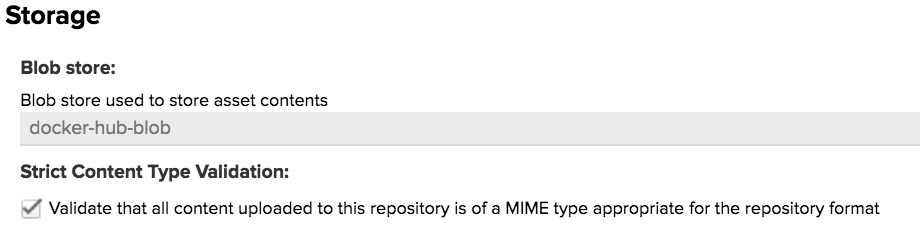
Storage
1.2 从远程docker hub获取base image tomcat:8.0-jre8-alpine
1.2.1 宿主机和nexus docker proxy仓库的认证
$ docker login -u admin -p admin123 localhost:50002
WARNING! Using --password via the CLI is insecure. Use --password-stdin.
Login Succeeded
检查配置文件~/.docker/config.json:
$ cat ~/.docker/config.json
{
    "auths": {
        "localhost:50000": {},
        "localhost:50001": {},
        "localhost:50002": {},
    },
    "HttpHeaders": {
        "User-Agent": "Docker-Client/17.09.1-ce (darwin)"
    },
    "credsStore": "osxkeychain"
}%
1.2.2 获取base image
$ docker images
REPOSITORY          TAG                 IMAGE ID            CREATED             SIZE
sonatype/nexus3     latest              0b6b1bc88ccb        7 days ago          484MB

$ docker pull localhost:50000/tomcat:8.0-jre8-alpine
8.0-jre8-alpine: Pulling from tomcat
2fdfe1cd78c2: Pull complete
82630fd6e5ba: Pull complete
119d364c885d: Pull complete
749ddbaec87a: Pull complete
801c4e05625b: Pull complete
08b85d1fac84: Pull complete
668b34e85733: Pull complete
859329ae45ee: Pull complete
Digest: sha256:fc67c79796f2bf034f9af3cf20fd1e051b780c403c31b945850c7e061c899bd7
Status: Downloaded newer image for localhost:50000/tomcat:8.0-jre8-alpine

$ docker images
REPOSITORY               TAG                 IMAGE ID            CREATED             SIZE
sonatype/nexus3          latest              0b6b1bc88ccb        7 days ago          484MB
localhost:50000/tomcat   8.0-jre8-alpine     5b01f7b2f446        3 weeks ago         117MB
1.2.3 查看nexus docker proxy 仓库
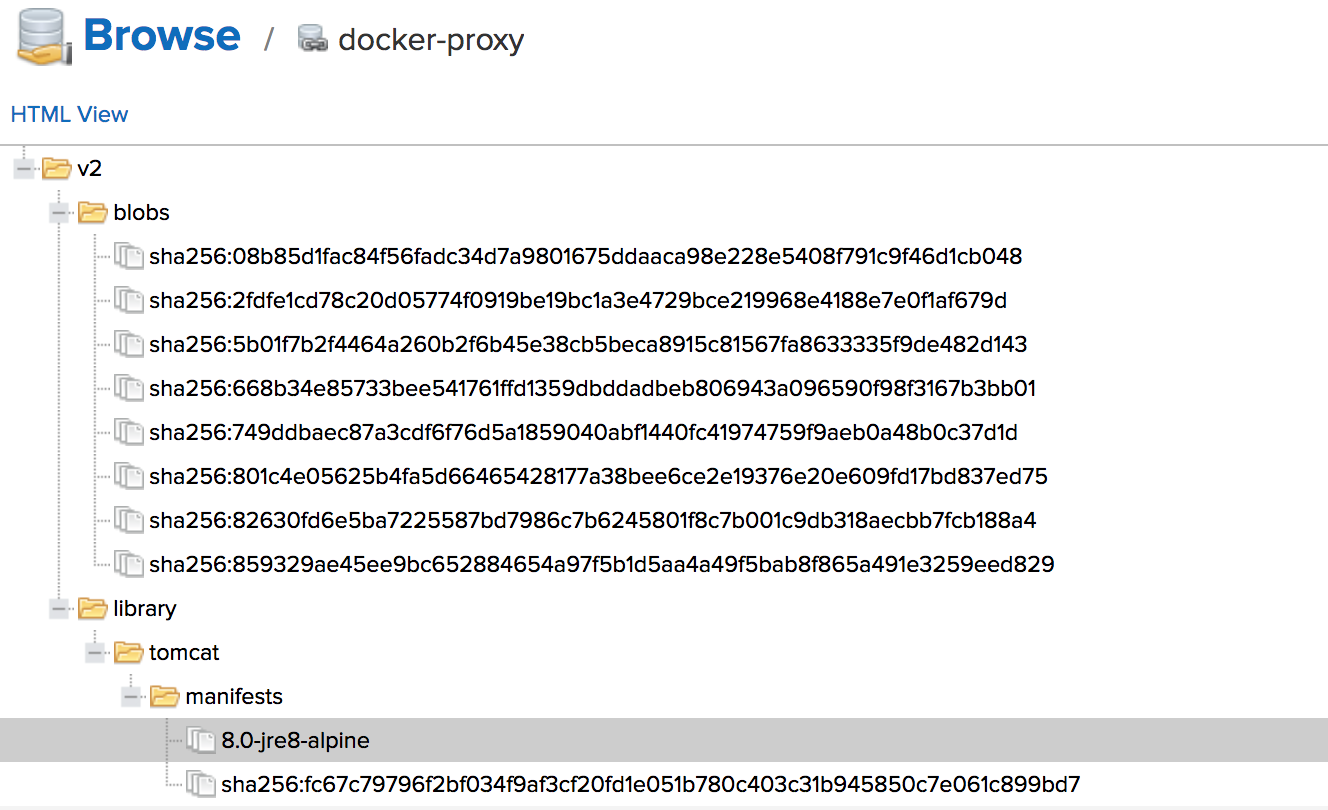 可以看到
可以看到tomcat:8.0-jre8-alpine在我们的docker proxy仓库里也存下来了。
1.3 可能出现的错误
1.3.1 getsockopt: connection refused
- 具体错误:
$ docker login -u admin -p admin123 localhost:50002 Error response from daemon: Get http://localhost:50002/v2/: dial tcp [::1]:50000: getsockopt: connection refused -
原因: nexus3-container端口号没有暴露给宿主机
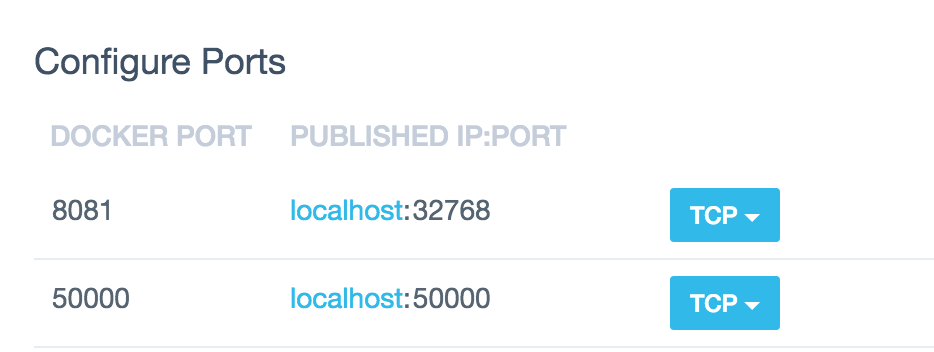
- 解决办法 在Docker for mac的Configure Ports处暴露端口号50002(下图暴露了50000、500001、500002供下文所用)
1.3.2. 401 Unauthorized
- 具体错误:
$ docker login -u admin -p admin123 localhost:50002 WARNING! Using --password via the CLI is insecure. Use --password-stdin. Error response from daemon: login attempt to http://localhost:50002/v2/ failed with status: 401 Unauthorized - 解决办法: 上面的Repository Connectors配置里,一定要勾选Force basic authentication
1.3.3. http: server gave HTTP response to HTTPS client
- 具体错误:
$ docker login -u admin -p admin123 localhost:50002 WARNING! Using --password via the CLI is insecure. Use --password-stdin. Error response from daemon: Get https://localhost:50002/v2/: http: server gave HTTP response to HTTPS client -
原因: 宿主机上的Docker daemon应该用HTTP通信,而不是HTTPS。
- 解决办法 对于不同的操作系统,配置的方法不一样。
对于Linux系统,应该在/etc/docker/daemon.json设置如下:
{
  "insecure-registries": [
    "localhost:50002",
    "localhost:50001",
    "localhost:50000",
  ],
  "disable-legacy-registry": true
}
对于Windows or Mac,应该设置如下: 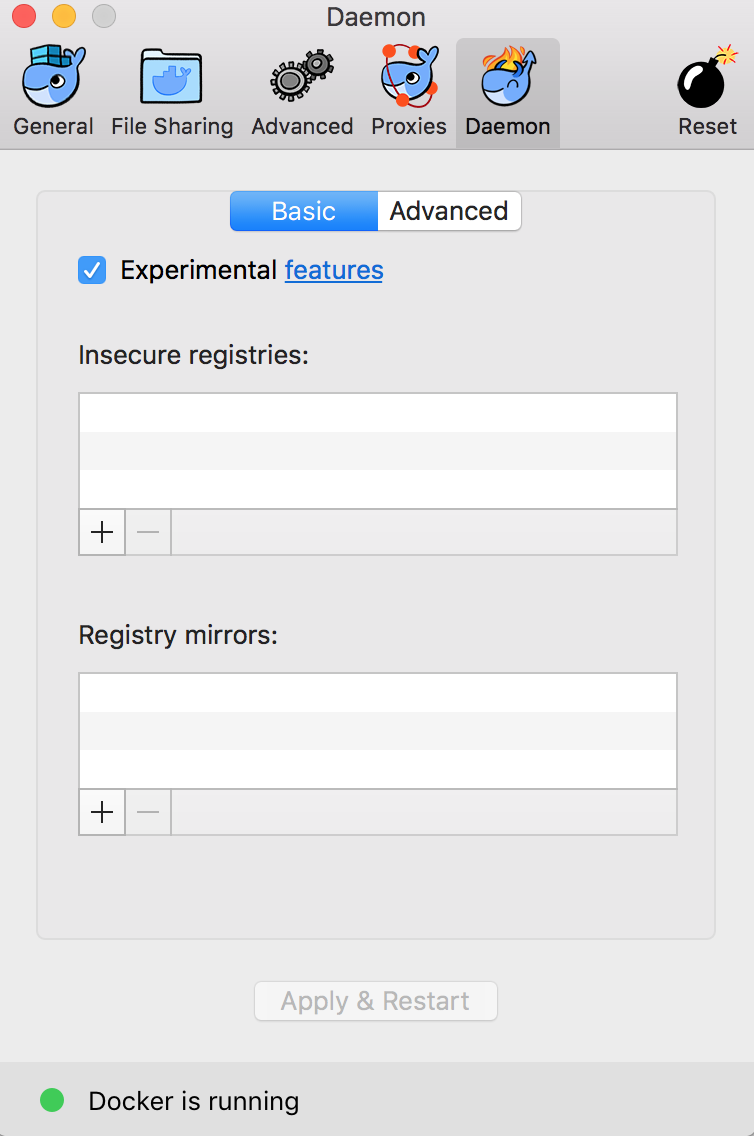
2. 创建docker hosted仓库
配置如下图所示: 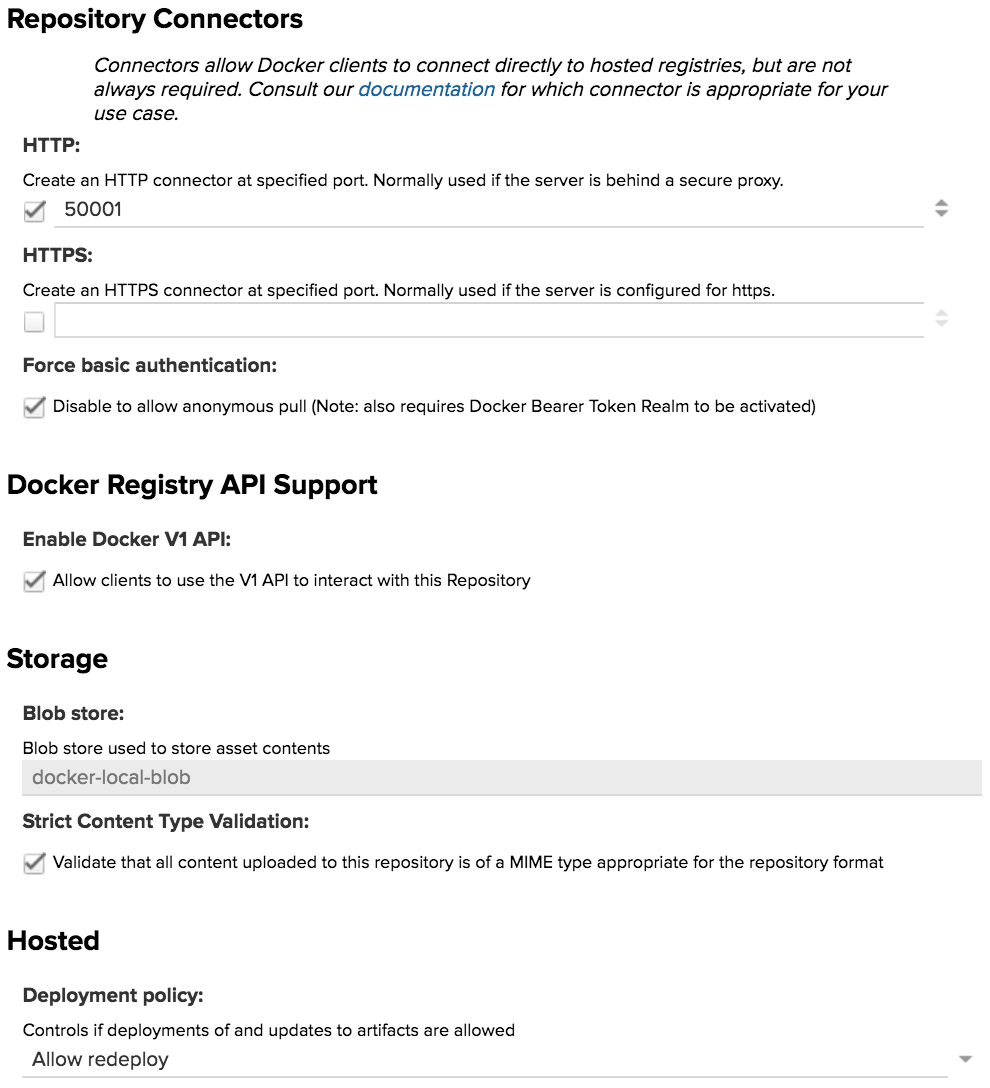
3. 创建docker group仓库
配置如下图所示: 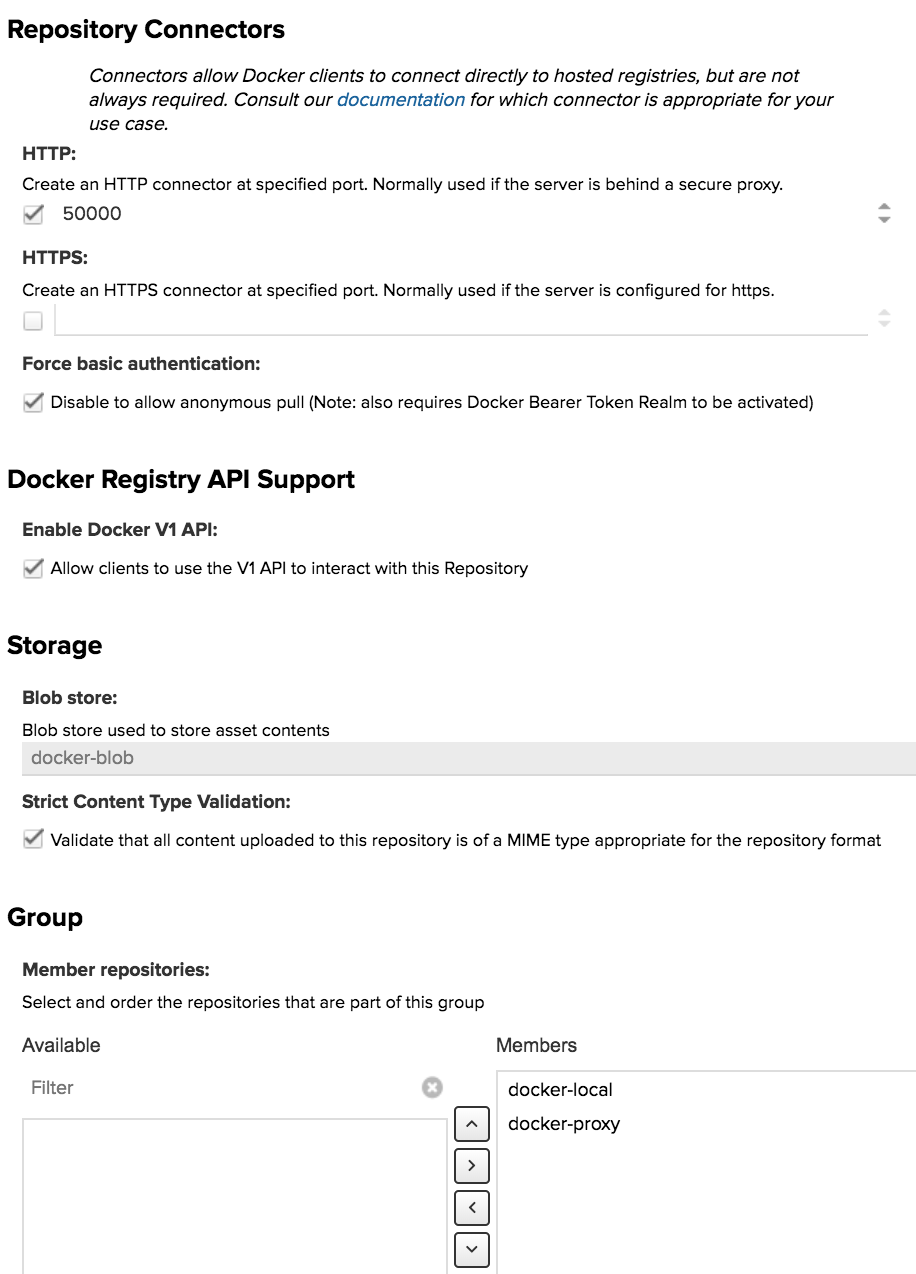
三、构建应用image上传至nexus
1. 构建应用image
1.1 准备一个单独的文件夹,避免不必要的干扰
mkdir docker
1.2 准备材料Dockerfile和war包
- Dockerfile
FROM localhost:50000/tomcat:8.0-jre8-alpine

MAINTAINER yuzhang <1580074674@qq.com>

ADD simple-web-1.0.0.war /usr/local/tomcat/webapps/
端口号50000是docker group的端口号,该端口号既包含了docker proxy的端口,也包含了docker hosted的端口。
- simple-web-1.0.0.war
cp build/libs/simple-web-1.0.0.war docker/
1.3 构建镜像
$ docker build -t localhost:50001/simple-web:1.0.0 .
ending build context to Docker daemon  22.53kB
Step 1/3 : FROM localhost:50000/tomcat:8.0-jre8-alpine
 ---> 5b01f7b2f446
Step 2/3 : MAINTAINER yuzhang <1580074674@qq.com>
 ---> Running in 9eba56fa9840
 ---> 966ac719976a
Removing intermediate container 9eba56fa9840
Step 3/3 : ADD simple-web-1.0.0.war /usr/local/tomcat/webapps/
 ---> 6d3159ba5d64
Successfully built 6d3159ba5d64
Successfully tagged simple-web:1.0.0
这里的端口号只是为了待会上传时候,指定到docker hosted里面,因为group包含了两个端口。
1.4 查看宿主机上镜像
$ docker images
REPOSITORY               TAG                 IMAGE ID            CREATED             SIZE
simple-web               1.0.0               6d3159ba5d64        20 seconds ago      117MB
sonatype/nexus3          latest              0b6b1bc88ccb        7 days ago          484MB
localhost:50000/tomcat   8.0-jre8-alpine     5b01f7b2f446        3 weeks ago         117MB

$ docker history 6d3159ba5d64
IMAGE               CREATED             CREATED BY                                      SIZE                COMMENT
6d3159ba5d64        41 seconds ago      /bin/sh -c #(nop) ADD file:1f503d2e5f794e3...   19.5kB
966ac719976a        41 seconds ago      /bin/sh -c #(nop)  MAINTAINER yuzhang <158...   0B
5b01f7b2f446        3 weeks ago         /bin/sh -c #(nop)  CMD ["catalina.sh" "run"]    0B
<missing>           3 weeks ago         /bin/sh -c #(nop)  EXPOSE 8080/tcp              0B
<missing>           3 weeks ago         /bin/sh -c set -e  && nativeLines="$(catal...   0B
<missing>           3 weeks ago         /bin/sh -c set -eux;   apk add --no-cache ...   20.9MB
<missing>           3 weeks ago         /bin/sh -c #(nop)  ENV TOMCAT_ASC_URLS=htt...   0B
<missing>           3 weeks ago         /bin/sh -c #(nop)  ENV TOMCAT_TGZ_URLS=htt...   0B
<missing>           3 weeks ago         /bin/sh -c #(nop)  ENV TOMCAT_SHA1=d2446c1...   0B
<missing>           3 weeks ago         /bin/sh -c #(nop)  ENV TOMCAT_VERSION=8.0.48    0B
<missing>           5 weeks ago         /bin/sh -c #(nop)  ENV TOMCAT_MAJOR=8           0B
<missing>           5 weeks ago         /bin/sh -c set -ex;  for key in $GPG_KEYS;...   124kB
<missing>           5 weeks ago         /bin/sh -c #(nop)  ENV GPG_KEYS=05AB331109...   0B
<missing>           5 weeks ago         /bin/sh -c apk add --no-cache gnupg             14.5MB
<missing>           5 weeks ago         /bin/sh -c #(nop)  ENV LD_LIBRARY_PATH=/us...   0B
<missing>           5 weeks ago         /bin/sh -c #(nop)  ENV TOMCAT_NATIVE_LIBDI...   0B
<missing>           5 weeks ago         /bin/sh -c #(nop) WORKDIR /usr/local/tomcat     0B
<missing>           5 weeks ago         /bin/sh -c mkdir -p "$CATALINA_HOME"            0B
<missing>           5 weeks ago         /bin/sh -c #(nop)  ENV PATH=/usr/local/tom...   0B
<missing>           5 weeks ago         /bin/sh -c #(nop)  ENV CATALINA_HOME=/usr/...   0B
<missing>           5 weeks ago         /bin/sh -c set -x  && apk add --no-cache  ...   77.8MB
<missing>           5 weeks ago         /bin/sh -c #(nop)  ENV JAVA_ALPINE_VERSION...   0B
<missing>           5 weeks ago         /bin/sh -c #(nop)  ENV JAVA_VERSION=8u151       0B
<missing>           5 weeks ago         /bin/sh -c #(nop)  ENV PATH=/usr/local/sbi...   0B
<missing>           5 weeks ago         /bin/sh -c #(nop)  ENV JAVA_HOME=/usr/lib/...   0B
<missing>           5 weeks ago         /bin/sh -c {   echo '#!/bin/sh';   echo 's...   87B
<missing>           5 weeks ago         /bin/sh -c #(nop)  ENV LANG=C.UTF-8             0B
<missing>           5 weeks ago         /bin/sh -c #(nop)  CMD ["/bin/sh"]              0B
<missing>           5 weeks ago         /bin/sh -c #(nop) ADD file:2b00f26f6004576...   4.14MB
1.4 确保镜像可用
$ docker run -it --rm -p 8090:8080 --name dockerwar localhost:50001/simple-web:1.0.0
Using CATALINA_BASE:   /usr/local/tomcat
Using CATALINA_HOME:   /usr/local/tomcat
Using CATALINA_TMPDIR: /usr/local/tomcat/temp
Using JRE_HOME:        /usr/lib/jvm/java-1.8-openjdk/jre
Using CLASSPATH:       /usr/local/tomcat/bin/bootstrap.jar:/usr/local/tomcat/bin/tomcat-juli.jar
10-Jan-2018 06:57:07.050 INFO [main] org.apache.catalina.startup.VersionLoggerListener.log Server version:        Apache Tomcat/8.0.48
10-Jan-2018 06:57:07.052 INFO [main] org.apache.catalina.startup.VersionLoggerListener.log Server built:          Nov 30 2017 16:26:50 UTC
10-Jan-2018 06:57:07.052 INFO [main] org.apache.catalina.startup.VersionLoggerListener.log Server number:         8.0.48.0
10-Jan-2018 06:57:07.052 INFO [main] org.apache.catalina.startup.VersionLoggerListener.log OS Name:               Linux
10-Jan-2018 06:57:07.052 INFO [main] org.apache.catalina.startup.VersionLoggerListener.log OS Version:            4.9.49-moby
10-Jan-2018 06:57:07.053 INFO [main] org.apache.catalina.startup.VersionLoggerListener.log Architecture:          amd64
10-Jan-2018 06:57:07.053 INFO [main] org.apache.catalina.startup.VersionLoggerListener.log Java Home:             /usr/lib/jvm/java-1.8-openjdk/jre
10-Jan-2018 06:57:07.053 INFO [main] org.apache.catalina.startup.VersionLoggerListener.log JVM Version:           1.8.0_151-b12
10-Jan-2018 06:57:07.053 INFO [main] org.apache.catalina.startup.VersionLoggerListener.log JVM Vendor:            Oracle Corporation
10-Jan-2018 06:57:07.053 INFO [main] org.apache.catalina.startup.VersionLoggerListener.log CATALINA_BASE:         /usr/local/tomcat
10-Jan-2018 06:57:07.053 INFO [main] org.apache.catalina.startup.VersionLoggerListener.log CATALINA_HOME:         /usr/local/tomcat
10-Jan-2018 06:57:07.054 INFO [main] org.apache.catalina.startup.VersionLoggerListener.log Command line argument: -Djava.util.logging.config.file=/usr/local/tomcat/conf/logging.properties
10-Jan-2018 06:57:07.054 INFO [main] org.apache.catalina.startup.VersionLoggerListener.log Command line argument: -Djava.util.logging.manager=org.apache.juli.ClassLoaderLogManager
10-Jan-2018 06:57:07.054 INFO [main] org.apache.catalina.startup.VersionLoggerListener.log Command line argument: -Djdk.tls.ephemeralDHKeySize=2048
10-Jan-2018 06:57:07.054 INFO [main] org.apache.catalina.startup.VersionLoggerListener.log Command line argument: -Djava.protocol.handler.pkgs=org.apache.catalina.webresources
10-Jan-2018 06:57:07.055 INFO [main] org.apache.catalina.startup.VersionLoggerListener.log Command line argument: -Dignore.endorsed.dirs=
10-Jan-2018 06:57:07.055 INFO [main] org.apache.catalina.startup.VersionLoggerListener.log Command line argument: -Dcatalina.base=/usr/local/tomcat
10-Jan-2018 06:57:07.055 INFO [main] org.apache.catalina.startup.VersionLoggerListener.log Command line argument: -Dcatalina.home=/usr/local/tomcat
10-Jan-2018 06:57:07.055 INFO [main] org.apache.catalina.startup.VersionLoggerListener.log Command line argument: -Djava.io.tmpdir=/usr/local/tomcat/temp
10-Jan-2018 06:57:07.055 INFO [main] org.apache.catalina.core.AprLifecycleListener.lifecycleEvent Loaded APR based Apache Tomcat Native library 1.2.16 using APR version 1.6.3.
10-Jan-2018 06:57:07.055 INFO [main] org.apache.catalina.core.AprLifecycleListener.lifecycleEvent APR capabilities: IPv6 [true], sendfile [true], accept filters [false], random [true].
10-Jan-2018 06:57:07.058 INFO [main] org.apache.catalina.core.AprLifecycleListener.initializeSSL OpenSSL successfully initialized (OpenSSL 1.0.2m  2 Nov 2017)
10-Jan-2018 06:57:07.140 INFO [main] org.apache.coyote.AbstractProtocol.init Initializing ProtocolHandler ["http-apr-8080"]
10-Jan-2018 06:57:07.147 INFO [main] org.apache.coyote.AbstractProtocol.init Initializing ProtocolHandler ["ajp-apr-8009"]
10-Jan-2018 06:57:07.148 INFO [main] org.apache.catalina.startup.Catalina.load Initialization processed in 387 ms
10-Jan-2018 06:57:07.165 INFO [main] org.apache.catalina.core.StandardService.startInternal Starting service Catalina
10-Jan-2018 06:57:07.165 INFO [main] org.apache.catalina.core.StandardEngine.startInternal Starting Servlet Engine: Apache Tomcat/8.0.48
10-Jan-2018 06:57:07.201 INFO [localhost-startStop-1] org.apache.catalina.startup.HostConfig.deployWAR Deploying web application archive /usr/local/tomcat/webapps/simple-web-1.0.0.war
10-Jan-2018 06:57:07.450 INFO [localhost-startStop-1] org.apache.jasper.servlet.TldScanner.scanJars At least one JAR was scanned for TLDs yet contained no TLDs. Enable debug logging for this logger for a complete list of JARs that were scanned but no TLDs were found in them. Skipping unneeded JARs during scanning can improve startup time and JSP compilation time.
10-Jan-2018 06:57:07.478 INFO [localhost-startStop-1] org.apache.catalina.startup.HostConfig.deployWAR Deployment of web application archive /usr/local/tomcat/webapps/simple-web-1.0.0.war has finished in 277 ms
10-Jan-2018 06:57:07.480 INFO [localhost-startStop-1] org.apache.catalina.startup.HostConfig.deployDirectory Deploying web application directory /usr/local/tomcat/webapps/manager
10-Jan-2018 06:57:07.511 INFO [localhost-startStop-1] org.apache.catalina.startup.HostConfig.deployDirectory Deployment of web application directory /usr/local/tomcat/webapps/manager has finished in 31 ms
10-Jan-2018 06:57:07.511 INFO [localhost-startStop-1] org.apache.catalina.startup.HostConfig.deployDirectory Deploying web application directory /usr/local/tomcat/webapps/examples
10-Jan-2018 06:57:07.671 INFO [localhost-startStop-1] org.apache.catalina.startup.HostConfig.deployDirectory Deployment of web application directory /usr/local/tomcat/webapps/examples has finished in 160 ms
10-Jan-2018 06:57:07.672 INFO [localhost-startStop-1] org.apache.catalina.startup.HostConfig.deployDirectory Deploying web application directory /usr/local/tomcat/webapps/docs
10-Jan-2018 06:57:07.683 INFO [localhost-startStop-1] org.apache.catalina.startup.HostConfig.deployDirectory Deployment of web application directory /usr/local/tomcat/webapps/docs has finished in 11 ms
10-Jan-2018 06:57:07.683 INFO [localhost-startStop-1] org.apache.catalina.startup.HostConfig.deployDirectory Deploying web application directory /usr/local/tomcat/webapps/ROOT
10-Jan-2018 06:57:07.709 INFO [localhost-startStop-1] org.apache.catalina.startup.HostConfig.deployDirectory Deployment of web application directory /usr/local/tomcat/webapps/ROOT has finished in 26 ms
10-Jan-2018 06:57:07.709 INFO [localhost-startStop-1] org.apache.catalina.startup.HostConfig.deployDirectory Deploying web application directory /usr/local/tomcat/webapps/host-manager
10-Jan-2018 06:57:07.726 INFO [localhost-startStop-1] org.apache.catalina.startup.HostConfig.deployDirectory Deployment of web application directory /usr/local/tomcat/webapps/host-manager has finished in 17 ms
10-Jan-2018 06:57:07.729 INFO [main] org.apache.coyote.AbstractProtocol.start Starting ProtocolHandler ["http-apr-8080"]
10-Jan-2018 06:57:07.738 INFO [main] org.apache.coyote.AbstractProtocol.start Starting ProtocolHandler ["ajp-apr-8009"]
10-Jan-2018 06:57:07.741 INFO [main] org.apache.catalina.startup.Catalina.start Server startup in 592 ms
浏览器访问http://localhost:8090/simple-web-1.0.0/,可以看到hello world出现。
- 直接访问
http://localhost:8090/,可以看到tomcat的页面,但是密码不确定。
可以直接登录到容器中查看/usr/local/tomcat/conf/tomcat-users.xml的配置$ docker exec -it dockerwar /bin/bash bash-4.4# ls LICENSE RELEASE-NOTES bin include logs temp work NOTICE RUNNING.txt conf lib native-jni-lib webapps $ docker exec -it dockerwar /bin/bash bash-4.4# ls LICENSE RELEASE-NOTES bin include logs temp work NOTICE RUNNING.txt conf lib native-jni-lib webapps - 上述应用的二级路由是
simple-web-1.0.0,也可以从容器中看出来:bash-4.4# cd webapps/ bash-4.4# ls ROOT docs examples host-manager manager simple-web-1.0.0 simple-web-1.0.0.war
2. 上传至nexus local仓库
2.1 上传
docker push localhost:50001/simple-web:1.0.0
2.2 查看docker hosted仓库
下图,可看到上传的simple-web应用的docker镜像了: 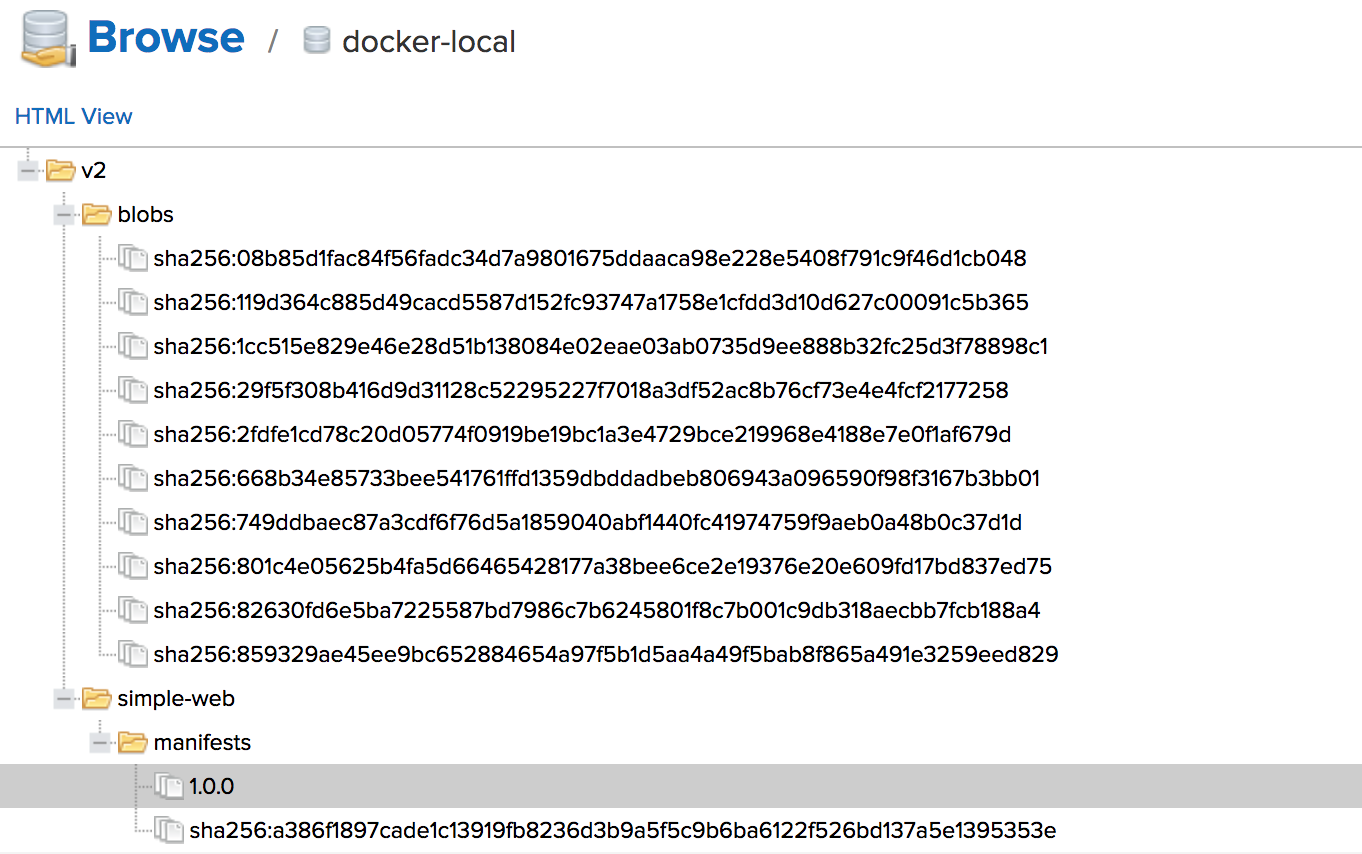
2.3 查看docker group仓库
下图,可看到之前proxy中的上传的tomcat:8.0-jre8-alpine镜像,以及我们自己构建的simple-web应用的docker镜像了: 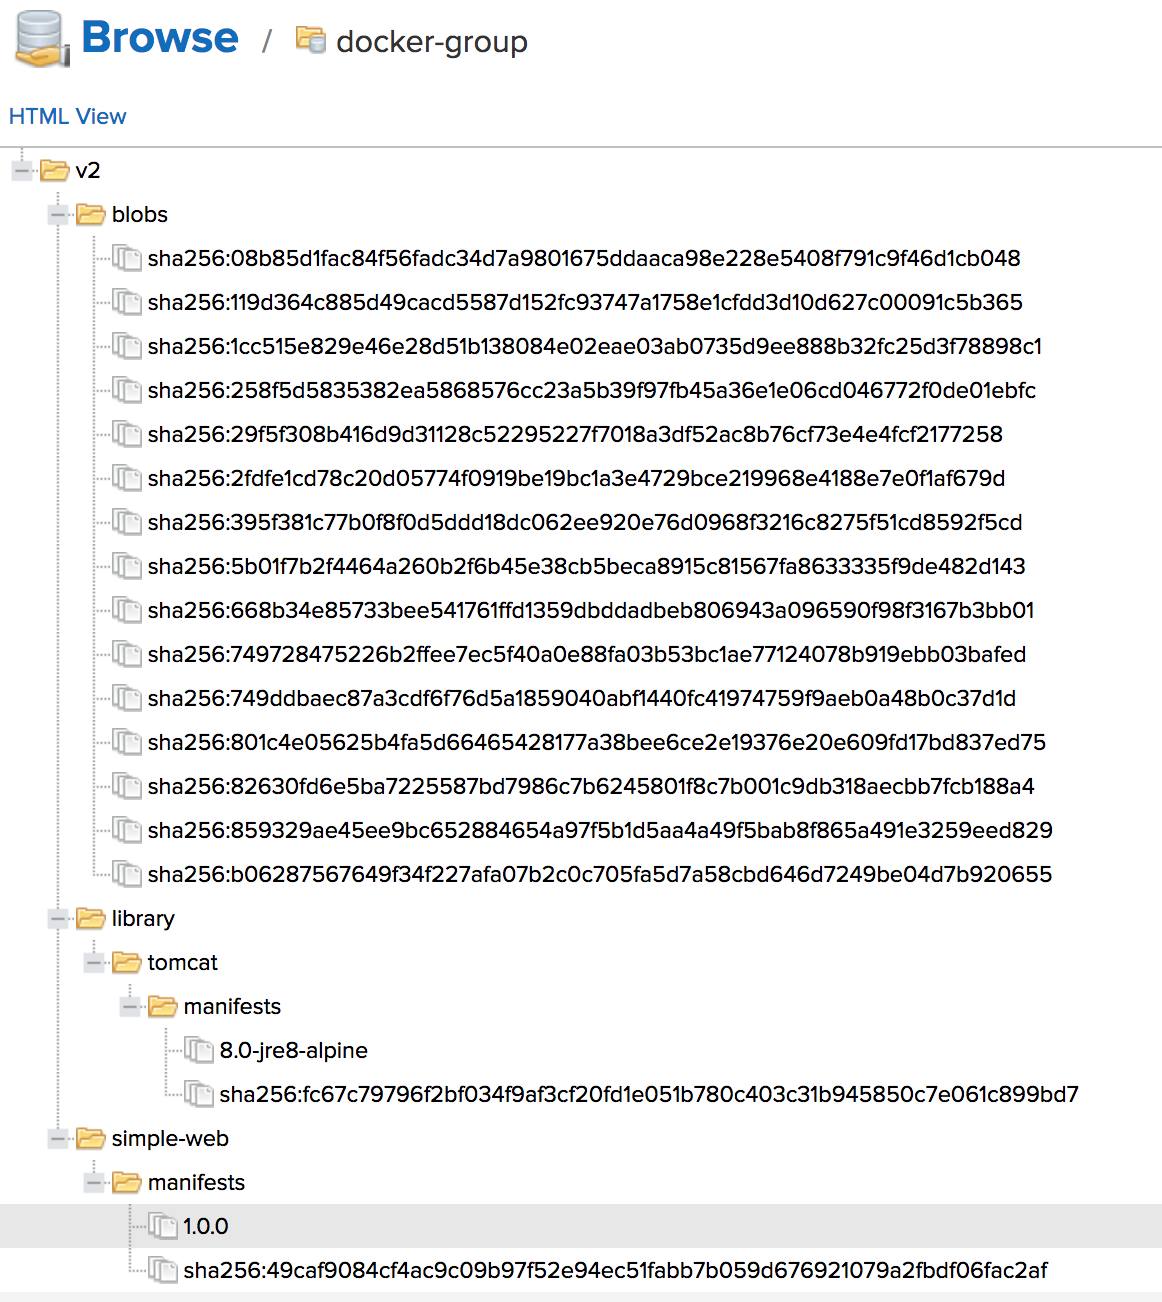
2.4 删除本地镜像,从docker hosted仓库获取镜像
$ docker pull localhost:50001/simple-web:1.0.0
1.0.0: Pulling from simple-web
2fdfe1cd78c2: Already exists
82630fd6e5ba: Already exists
119d364c885d: Already exists
749ddbaec87a: Already exists
801c4e05625b: Already exists
08b85d1fac84: Already exists
668b34e85733: Already exists
859329ae45ee: Already exists
46f4c89e382c: Pull complete
Digest: sha256:c99901dc39278d97cf33e9dbe0af9a95d3d6b081884a16c0f9c94649308f0b5c
Status: Downloaded newer image for localhost:50001/simple-web:1.0.0

$ docker images
REPOSITORY                   TAG                 IMAGE ID            CREATED             SIZE
localhost:50001/simple-web   1.0.0               326e5af13176        6 hours ago         117MB
sonatype/nexus3              latest              0b6b1bc88ccb        7 days ago          484MB
localhost:50000/tomcat       8.0-jre8-alpine     5b01f7b2f446        3 weeks ago         117MB
3. 用shell脚本简化过程
3.1 编写shell脚本
将上述手动过程写在如下shell脚本中,其中包含了:生成war包、准备构建镜像材料、构建镜像、上传镜像、删除本地构建等内容:
DOCKER_HOSTED_REPO=localhost:50001

./gradlew clean build

mkdir docker

cp build/libs/simple-web-1.0.0.war docker/

cp Dockerfile docker/

cd docker

docker login -u admin -p admin123 ${DOCKER_HOSTED_REPO}

docker build -t ${DOCKER_HOSTED_REPO}/simple-web:1.0.0 .

docker push ${DOCKER_HOSTED_REPO}/simple-web:1.0.0

docker rmi ${DOCKER_HOSTED_REPO}/simple-web:1.0.0

rm -rf docker/

rm -rf build/
3.2 更改执行权限
sudo chmod 777 go.sh
3.3 执行脚本,进行测试
执行脚本之前,可删除本地的程序构建产物、本地的应用程序docker镜像、远程的应用程序docker镜像。然后执行脚本之后,再次查看nexus hosted仓库是否有应用程序的docker镜像。
$ ./go.sh

BUILD SUCCESSFUL in 0s
3 actionable tasks: 2 executed, 1 up-to-date
WARNING! Using --password via the CLI is insecure. Use --password-stdin.
Login Succeeded
Sending build context to Docker daemon  22.53kB
Step 1/3 : FROM localhost:50000/tomcat:8.0-jre8-alpine
 ---> 5b01f7b2f446
Step 2/3 : MAINTAINER yuzhang <1580074674@qq.com>
 ---> Using cache
 ---> fdcb287ed111
Step 3/3 : ADD simple-web-1.0.0.war /usr/local/tomcat/webapps/
 ---> 29f5f308b416
Successfully built 29f5f308b416
Successfully tagged localhost:50001/simple-web:1.0.0
The push refers to a repository [localhost:50001/simple-web]
8ccf53e87baa: Pushed
8d6f8df9c63b: Pushed
dab1340429ea: Pushed
dd97dc3a613e: Pushed
63680cd47754: Pushed
efe8908e7b83: Pushed
25baa3ba1903: Pushed
5b1e27e74327: Pushed
04a094fe844e: Pushed
1.0.0: digest: sha256:a386f1897cade1c13919fb8236d3b9a5f5c9b6ba6122f526bd137a5e1395353e size: 2204
最后
本篇文章主要是利用nexus构建了docker相关的仓库(docker proxy、docker hosted、docker hosted仓库)。 通过docker proxy仓库代理Docker Hub,从远程下载base image;基于base image构建自己的应用程序镜像; 最后将应用程序镜像push到private的docker hosted仓库中。
根据构建产物构建镜像、上传镜像的过程,可以用一个shell脚本完成,详细可以参考Github代码。
Github代码地址:https://github.com/zhangyuyu/Simple-web