一、前言
上一篇 Docker的数据存储主要讲述Docker数据管理的两种方式:数据卷和数据卷容器。
本篇主要讲述网络的实现、网络模型、网络模式等相关知识。
二、背景
该系列《Docker in Production》内容包含如下部分:
- 容器简介
- Docker简介
- Docker的基本操作
- Docker数据存储
- Docker网络
- Docker安全
- 多主机部署
- 服务发现
- 日志、跟踪、监控
三、网络的实现
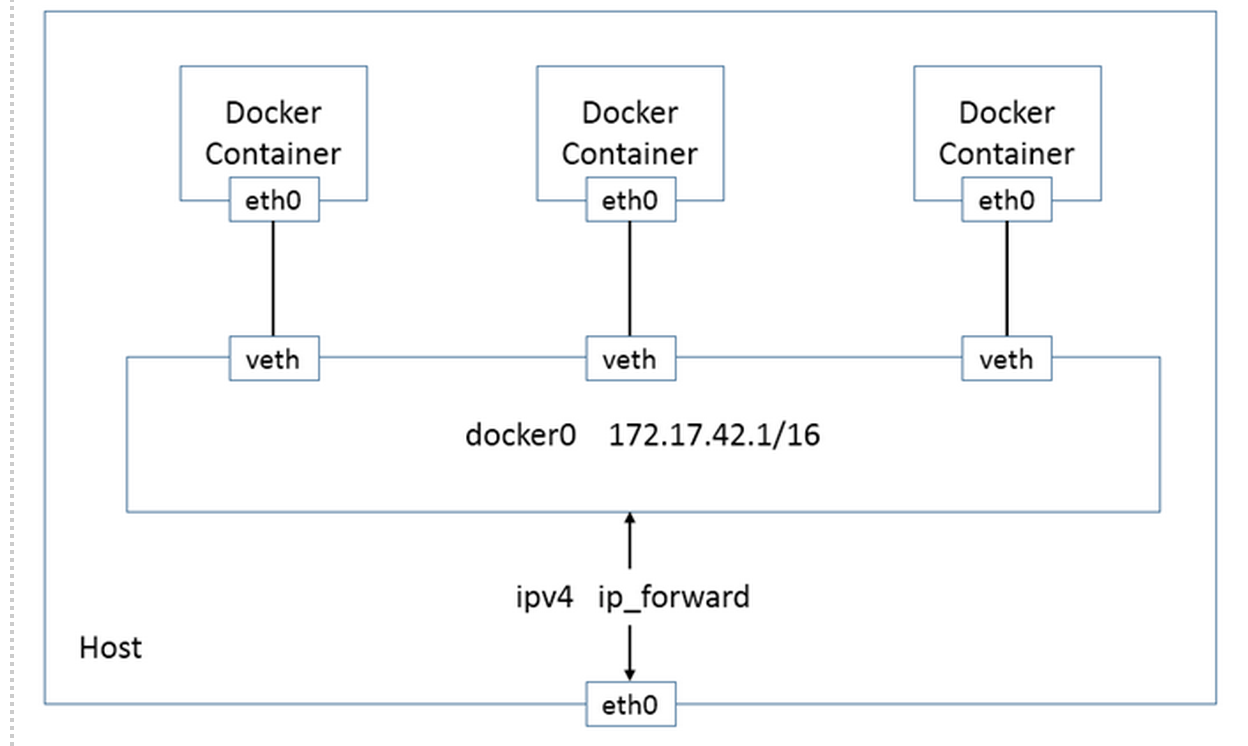
Docker现有的网络模型主要是通过使用Network namespace、Linux Bridge、Iptables、veth pair等技术实现的。
- Network namespace(网络命名空间)
Network namespace主要提供了关于网络资源的隔离,包括网络设备、IPv4和IPv6协议栈、IP路由表、防火墙、 /proc/net目录、/sys/class/net目录、端口(socket)等。 - Linux Bridge
功能相当于物理交换机,为连在其上的设备(容器)转发数据帧。如docker0网桥。 - Iptables
主要为容器提供NAT以及容器网络安全。 - veth pair(虚拟网络设备)
两个虚拟网卡组成的数据通道。在Docker中,用于连接Docker容器和Linux Bridge。一端在容器中作为eth0网卡, 另一端在Linux Bridge中作为网桥的一个端口。
四、网络创建过程
 Docker创建一个容器的时候,会具体执行如下操作:
- 创建一对虚拟接口,即veth pair,分别放到宿主机和容器中;
- 本地主机一端的虚拟接口,连接到默认的docker0网桥或指定网桥上,并具有一个以veth开头的唯一的名字,如veth0ac844e;
- 容器一端的虚拟接口,将放到新容器中,并修改名字为eth0,该接口只在容器的命名空间可见;
- 从网桥可用地址段中获取一个空闲地址分配给容器的eth0(例如172.17.0.2/16),并配置默认路由网关为dokcer0的IP地址。
完成这些配置之后,该容器就可以使用eth0虚拟网卡来连接其它容器和访问外部网络了。
当该容器结束后,Docker会清空容器,容器内的网络接口eth0会随网络命名空间一起被清除,veth0ac844e接口也被自动从docker0卸载。
另外,可以在docker运行的时候通过–net参数指定容器的网络配置,有四个可选值。
【练习1】网络创建细节
1)启动一个 /bin/bash 容器,指定 –net=none 参数
$ sudo docker run -i -t --rm --net=none busybox /bin/sh
2) 在本地主机查找容器的进程 id,并为它创建网络命名空间。
$ sudo docker inspect -f '' 5259b04d2a50
2559
$ pid=2559
$ sudo mkdir -p /var/run/netns
$ sudo ln -s /proc/$pid/ns/net /var/run/netns/$pid
3)查看网桥docker0分配的子网段
$ ip addr show docker0
6: docker0: <BROADCAST,MULTICAST,UP,LOWER_UP> mtu 1500 qdisc noqueue state UP group default
    link/ether 02:42:89:d3:35:32 brd ff:ff:ff:ff:ff:ff
    inet 172.17.0.1/16 scope global docker0
       valid_lft forever preferred_lft forever
    inet6 fe80::42:89ff:fed3:3532/64 scope link
       valid_lft forever preferred_lft forever
4) 创建一对 “veth pair” 接口 A 和 B,绑定 A 到网桥 docker0,并启用它
$ sudo ip link add A type veth peer name B
$ sudo brctl addif docker0 A
$ sudo ip link set A up
5)将B放到容器的网络命名空间,命名为 eth0,启动它并配置一个可用 IP(桥接网段)和默认网关
$ sudo ip link set B netns $pid
$ sudo ip netns exec $pid ip link set dev B name eth0
$ sudo ip netns exec $pid ip link set eth0 up
$ sudo ip netns exec $pid ip addr add 172.17.42.1/16 dev eth0
$ sudo ip netns exec $pid ip route add default via 172.17.0.1
6) 其他指令
# 查看网桥docker0上的虚拟接口
$ brctl show
bridge name bridge id       STP enabled interfaces
br-fe42067d4b8f     8000.0242987a3884   no
docker0     8000.024289d33532   no      veth76e4a32
lxcbr0      8000.000000000000   no

# 查看网桥docker0的生成树状态
$ brctl show docker0
bridge name bridge id       STP enabled interfaces
docker0     8000.024289d33532   no      veth76e4a32

# 查看网桥docker0的网卡驱动类型
$ ethtool -i docker0
driver: bridge
version: 2.3
firmware-version: N/A
bus-info: N/A
supports-statistics: no
supports-test: no
supports-eeprom-access: no
supports-register-dump: no
supports-priv-flags: no

# 查看该网络接口的唯一识别编号peer_ifindex
$ ethtool -S veth76e4a32
NIC statistics:
     peer_ifindex: 7

# 查看路由信息
$ sudo iptables -L
Chain INPUT (policy ACCEPT)
target     prot opt source               destination
ACCEPT     tcp  --  anywhere             anywhere             tcp dpt:domain
ACCEPT     udp  --  anywhere             anywhere             udp dpt:domain
ACCEPT     tcp  --  anywhere             anywhere             tcp dpt:bootps
ACCEPT     udp  --  anywhere             anywhere             udp dpt:bootps
Chain FORWARD (policy ACCEPT)
target     prot opt source               destination
DROP       all  --  172.18.0.0/16        172.17.0.0/16
DROP       all  --  172.17.0.0/16        172.18.0.0/16
DOCKER     all  --  anywhere             anywhere
ACCEPT     all  --  anywhere             anywhere             ctstate RELATED,ESTABLISHED
ACCEPT     all  --  anywhere             anywhere
ACCEPT     all  --  anywhere             anywhere
DOCKER     all  --  anywhere             anywhere
ACCEPT     all  --  anywhere             anywhere             ctstate RELATED,ESTABLISHED
ACCEPT     all  --  anywhere             anywhere
ACCEPT     all  --  anywhere             anywhere
ACCEPT     all  --  anywhere             anywhere
ACCEPT     all  --  anywhere             anywhere
Chain OUTPUT (policy ACCEPT)
target     prot opt source               destination
Chain DOCKER (2 references)
target     prot opt source               destination
ACCEPT     tcp  --  anywhere             172.17.0.2           tcp dpt:5000
五、网络模型
基本组件
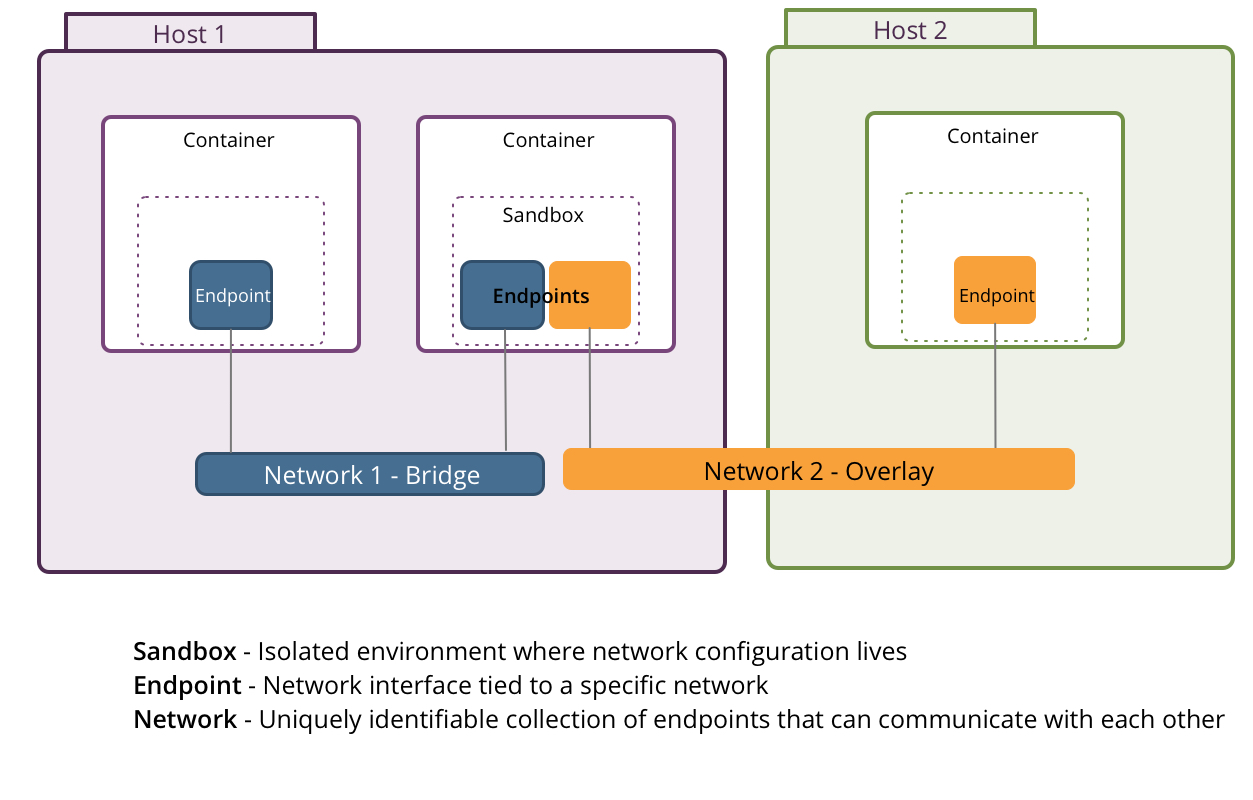
在容器网络模型中,通常会包括容器(Container)、沙箱(Sandbox)、端点(Endpoint)、网络(Network)等组件,其中,网络会涉及桥接网(Bridge Network)或重叠网(Overlay Network)。 
- 容器(Container): 容器能够作为任意一个或多个网络的一部分,能够同时对接桥接网和重叠网网络。
- 沙箱(Sandbox): 包含容器网络堆栈配置信息,是一个隔离的环境,可能包含多网络的多个端点。
- 端点(Endpoint): 连接沙箱和网络的接口,绑定到特定的网络,比如之前提到的veth pair。
- 网络(Network): 使得一组端点之间能够相互直接交流的,实现可以是Linux网桥或重叠
与Docker Links对比
与Docker Links进行简单对比,Docker Links允许容器之间互相发现,并使用容器名作为别名进行互相之间的通信, 比DNS或服务发现更容易使用,且不用关心端口映射,但Docker Links有一些限制,比如:
- 只能在同一宿主机内使用,不能跨主机
- 重新创建容器会移除之前的链接(Links)
- 被链接的容器必须是一个已经启动的容器
因此,在Docker 1.9版本之后,官方推荐使用Docker网络功能代替Docker Links。Docker容器网络模型的主要优势在于:
- 在某个特定网络下的所有容器能自由地相互通信
- 多个网络有助于分散容器之间的流量传输
- 多个端点允许一个容器加入到多个网络中
- 能够支持同主机和跨主机的容器间通信
四、Docker网络模式
1-单节点网络模式
1-1.bridge模式
使用–net=bridge指定
该模式中,Docker守护进程创建一个虚拟以太网桥docker0,附加在其上的任何网卡之间都能自动转发数据包。默认情况下, 守护进程会创建一对对等接口,将其中一个接口设置为容器的eth0接口,另一个接口放置在宿主机的命名空间中, 从而将宿主机上的所有容器都连接到这个内部网络上。同时,守护进程还会从网桥的私有地址空间中分配一个IP地址和子网给该容器。
1-2.host模式
使用–net=host指定
该模式将禁用Docker容器的网络隔离。因为容器共享了宿主机的网络命名空间,直接暴露在公共网络中。因此, 你需要通过端口映射(port mapping)来进行协调。
当使用host模式网络时,容器实际上继承了宿主机的IP地址。该模式比bridge模式更快(因为没有路由开销), 但是它将容器直接暴露在公共网络中,是有安全隐患的。
1-3.container模式
使用–net=container指定
该模式会重用另一个容器的网络命名空间。通常来说,当你想要自定义网络栈时,该模式是很有用的。 实际上,该模式也是Kubernetes使用的网络模式。
1-4.none模式
使用–net=none指定
该模式将容器放置在它自己的网络栈中,但是并不进行任何配置。实际上,该模式关闭了容器的网络功能,在以下两种情况下是有用的:
- 容器并不需要网络(例如只需要写磁盘卷的批处理任务);
- 你希望自定义网络。
【练习2】单主机创建网络
1) 创建web网络,并创建一个基于web网络的容器web_container
$ docker network create web
a3f32cf362412ca10cc375c0cbf304c15b1cfd2a0da6addb97ef3606bcb04350
$ docker network ls
NETWORK ID          NAME                DRIVER
134b9d559a29        host                host
20d10cc6ad42        bridge              bridge
a3f32cf36241        web                 bridge
e7f9d75e45b8        none                null
$ docker run -itd --net=web --name web_container busybox
fdec55f5db5da821825fe5b091e69e248f8f346273a9397ea66a931b4c26bb7f
$ docker network inspect web
[
    {
        "Name": "web",
        "Id": "a3f32cf362412ca10cc375c0cbf304c15b1cfd2a0da6addb97ef3606bcb04350",
        "Scope": "local",
        "Driver": "bridge",
        "IPAM": {
            "Driver": "default",
            "Config": [
                {}
            ]
        },
        "Containers": {
            "fdec55f5db5da821825fe5b091e69e248f8f346273a9397ea66a931b4c26bb7f": {
                "EndpointID": "67b284bcef2544ec153c90e041c7d51351d5f2cea63e31537352e37ac8fb1fe6",
                "MacAddress": "02:42:ac:12:00:02",
                "IPv4Address": "172.18.0.2/16",
                "IPv6Address": ""
            }
        },
        "Options": {}
    }
]
2) 重复操作1),创建另外一个基于app网络的容器
$ docker network create app
$ docker network ls
NETWORK ID          NAME                DRIVER
20d10cc6ad42        bridge              bridge
a3f32cf36241        web                 bridge
e7f9d75e45b8        none                null
134b9d559a29        host                host
73eda6fce093        app                 bridge
$ docker run -itd --name app_container --net=app busybox
$ docker network inspect app
3) 连接web_container到app网络
$ docker network connect app web_container
这样web_container就可以通过web_container.app连接app网络了:
$ docker exec app_container ping web_container.app
PING web_container.app (172.19.0.3): 56 data bytes
64 bytes from 172.19.0.3: seq=0 ttl=64 time=0.118 ms
64 bytes from 172.19.0.3: seq=1 ttl=64 time=0.080 ms
4) 连接app_container到web网络
# 连接之前:
$ docker exec web_container ping app_container.web
ping: bad address 'app_container.web'

# 连接
$ docker network connect web app_container

# 连接之后
$ docker exec web_container ping app_container.web
PING app_container.web (172.18.0.3): 56 data bytes
64 bytes from 172.18.0.3: seq=0 ttl=64 time=0.219 ms
64 bytes from 172.18.0.3: seq=1 ttl=64 time=0.111 ms
5) 查看网络信息
- 查看连接之后web网络的containers里面就有两个container了
$ docker network inspect web [ { "Name": "web", "Id": "a3f32cf362412ca10cc375c0cbf304c15b1cfd2a0da6addb97ef3606bcb04350", "Scope": "local", "Driver": "bridge", "IPAM": { "Driver": "default", "Config": [ {} ] }, "Containers": { "59b01ca0444b4c708b521725532762512bc57ec9fdfccb2e2a6addef8a072f05": { "EndpointID": "dd969e4ec9703cf87adfd97b22bb8e06ec8a12139c948aceb6aea70388d23d31", "MacAddress": "02:42:ac:12:00:03", "IPv4Address": "172.18.0.3/16", "IPv6Address": "" }, "fdec55f5db5da821825fe5b091e69e248f8f346273a9397ea66a931b4c26bb7f": { "EndpointID": "67b284bcef2544ec153c90e041c7d51351d5f2cea63e31537352e37ac8fb1fe6", "MacAddress": "02:42:ac:12:00:02", "IPv4Address": "172.18.0.2/16", "IPv6Address": "" } }, "Options": {} } ] - 查看container的NetworkSettings,里面Networks有两个网络了:
$ docker inspect web_container
"Networks": {
          "app": {
              "EndpointID": "b06bbe5ea7dbaa96fecb2165404185effa0d6ebf01b028633f2afe00664cf16d",
              "Gateway": "172.19.0.1",
              "IPAddress": "172.19.0.3",
              "IPPrefixLen": 16,
              "IPv6Gateway": "",
              "GlobalIPv6Address": "",
              "GlobalIPv6PrefixLen": 0,
              "MacAddress": "02:42:ac:13:00:03"
          },
          "web": {
              "EndpointID": "67b284bcef2544ec153c90e041c7d51351d5f2cea63e31537352e37ac8fb1fe6",
              "Gateway": "172.18.0.1",
              "IPAddress": "172.18.0.2",
              "IPPrefixLen": 16,
              "IPv6Gateway": "",
              "GlobalIPv6Address": "",
              "GlobalIPv6PrefixLen": 0,
              "MacAddress": "02:42:ac:12:00:02"
          }
      }
2-多节点网络模式
2-1.原生支持
Docker 在 1.19 版本中引入的基于 VxLAN 的对跨节点网络的原生支持,即自带重叠网络(Overlay Network) 组件。
Docker 支持 Consul, Etcd, 和 ZooKeeper 三种分布式key-value 存储。其中,etcd 是一个高可用的分布式 k/v存储系统,使用etcd的场景默认处理的数据都是控制数据,对于应用数据,只推荐数据量很小,但是更新访问频繁的情况。
【练习3】利用Docker Swarm多主机创建网络
1) 先准备两台虚拟机作为Docker Swarm的两个节点Node1,Node2。
$ midir docker-cluster
$ cd docker-cluster
$ vim Vagrantfile
Vagrant.configure(2) do |config|
  (1..2).each do |i|
    config.vm.define "wanzi-node#{i}" do |node|
      node.vm.box = "comiq/dockerbox"
      node.vm.provider "virtualbox" do |vb|
        vb.name = "wanzi-node#{i}"
      end
    end
  end
end
$ vagrant up
Bringing machine 'wanzi-node1' up with 'virtualbox' provider...
Bringing machine 'wanzi-node2' up with 'virtualbox' provider...
==> wanzi-node1: Checking if box 'comiq/dockerbox' is up to date...
==> wanzi-node1: VirtualBox VM is already running.
==> wanzi-node2: Importing base box 'comiq/dockerbox'...
==> wanzi-node2: Matching MAC address for NAT networking...
==> wanzi-node2: Checking if box 'comiq/dockerbox' is up to date...
==> wanzi-node2: Setting the name of the VM: wanzi-node2
==> wanzi-node2: Fixed port collision for 22 => 2222. Now on port 2201.
==> wanzi-node2: Clearing any previously set network interfaces...
==> wanzi-node2: Preparing network interfaces based on configuration...
    wanzi-node2: Adapter 1: nat
==> wanzi-node2: Forwarding ports...
    wanzi-node2: 22 => 2201 (adapter 1)
==> wanzi-node2: Booting VM...
==> wanzi-node2: Waiting for machine to boot. This may take a few minutes...
    wanzi-node2: SSH address: 127.0.0.1:2201
    wanzi-node2: SSH username: vagrant
    wanzi-node2: SSH auth method: private key
    wanzi-node2: Warning: Connection timeout. Retrying...
==> wanzi-node2: Machine booted and ready!
==> wanzi-node2: Checking for guest additions in VM...
==> wanzi-node2: Mounting shared folders...
    wanzi-node2: /vagrant => /Users/yuzhang/Downloads/Devops/docker_cluster
2) Node1作为Manager 登陆到Node1:
$ vagrant ssh wanzi-node1
Welcome to Ubuntu 16.04 LTS (GNU/Linux 4.4.0-21-generic x86_64)
 * Documentation:  https://help.ubuntu.com
 * Management:     https://landscape.canonical.com
 * Support:        https://ubuntu.com/advantage
在Node1上初始化并创建Docker Swarm,作为Manager:
vagrant@vagrant:~$  docker swarm init --advertise-addr 192.168.59.1:2377
Swarm initialized: current node (85qhfwludbf603gcazjqippl2) is now a manager.
To add a worker to this swarm, run the following command:
docker swarm join \
--token SWMTKN-1-5rv6l22kow7fhpthihiy5oqi8ka4mospeele38ycsfuwsviv1y-bekemef3aafmbanavzkeekjch \
192.168.59.1:2377
To add a manager to this swarm, run 'docker swarm join-token manager' and follow the instructions.
3) Node2作为Worker 登陆到Node2:
$ vagrant ssh wanzi-node1
在Node2上运行如下命令加入到Swarm中,作为Worker:
vagrant@vagrant:~$ docker swarm join \
>     --token SWMTKN-1-5rv6l22kow7fhpthihiy5oqi8ka4mospeele38ycsfuwsviv1y-bekemef3aafmbanavzkeekjch \
>     192.168.59.1:2377
This node joined a swarm as a worker.
4) 在Node1上查看所有node信息
vagrant@vagrant:~$ docker node ls
ID                           HOSTNAME  STATUS  AVAILABILITY  MANAGER STATUS
85qhfwludbf603gcazjqippl2 *  vagrant   Ready   Active        Leader
9o4sy1vcd5nygr77jrjpl28sn    vagrant   Ready   Active
5) 在Node2上则不能查看所有node信息
vagrant@vagrant:~$ docker node ls
Error response from daemon: This node is not a swarm manager. Worker nodes can't be used to view or modify cluster state. Please run this command on a manager node or promote the current node to a manager.
6) 在Node1上创建overlay网络
vagrant@vagrant:~$ docker network create -d=overlay net_overlay
0aa8c2nu8vwwbep0spui8upva
vagrant@vagrant:~$ docker network ls
NETWORK ID          NAME                DRIVER              SCOPE
9cbbdda300b9        bridge              bridge              local
eb0832fa48cc        docker_gwbridge     bridge              local
d9cbc7492332        host                host                local
6agtuhiw3e1r        ingress             overlay             swarm
0aa8c2nu8vww        net_overlay         overlay             swarm
e5bb8590c3b8        none                null                local
这样,所有在Swarm中的主机都可以访问该网络了,除了docker0默认网桥外,这里多出了一个docker_gwbridge的网桥,docker0在跨多主机容器网络中并没有被用到,而是docker_gwbridge替代了docker0用来实现Overlay网络中容器间的通信以及容器到外部的通信,其职能就和单机容器网络中docker0一样。
vagrant@vagrant:~$ docker network inspect net_overlay
[
    {
        "Name": "net_overlay",
        "Id": "0aa8c2nu8vwwbep0spui8upva",
        "Scope": "swarm",
        "Driver": "overlay",
        "EnableIPv6": false,
        "IPAM": {
            "Driver": "default",
            "Options": null,
            "Config": []
        },
        "Internal": false,
        "Containers": null,
        "Options": {
            "com.docker.network.driver.overlay.vxlanid_list": "257"
        },
        "Labels": null
    }
]
7) 创建服务 创建一个名为hello的服务,包含2个副本,使用sleep infinity的命令运行,该命令使得容器不会立即退出:
vagrant@vagrant:~$ docker service ls
ID            NAME   REPLICAS  IMAGE   COMMAND
alq1vrojrwd6  hello  0/2       ubuntu  sleep infinity
vagrant@vagrant:~$ docker service ps hello
ID                         NAME     IMAGE   NODE     DESIRED STATE  CURRENT STATE          ERROR
66zkihz10oaoxv1i94niud0cy  hello.1  ubuntu  vagrant  Running        Running 4 seconds ago
08stnpfqhg3rhtb1nd3dxxade  hello.2  ubuntu  vagrant  Running        Running 5 seconds ago
可以分别在Node1和Node2上查看运行的容器: Node1:
vagrant@vagrant:~$ docker ps
CONTAINER ID        IMAGE               COMMAND             CREATED             STATUS              PORTS               NAMES
63f768d6b911        ubuntu:latest       "sleep infinity"    28 seconds ago      Up 27 seconds                           hello.2.08stnpfqhg3rhtb1nd3dxxade
Node2:
vagrant@vagrant:~$ docker ps
CONTAINER ID        IMAGE               COMMAND             CREATED             STATUS              PORTS               NAMES
e506461b95f3        ubuntu:latest       "sleep infinity"    48 seconds ago      Up 47 seconds                           hello.1.66zkihz10oaoxv1i94niud0cy
8) 检查连通性 Node1:
vagrant@vagrant:~$ docker inspect -f   63f768d6b911
10.0.0.4
Node2:
vagrant@vagrant:~$ docker inspect -f   e506461b95f3
10.0.0.3

 vagrant@vagrant:~$ docker exec hello.1.66zkihz10oaoxv1i94niud0cy apt-get update; apt-get install iputils-ping -y; ping 10.0.0.4
2-2.插件
该方式是通过插件(plugin)方式引入的第三方实现方案,比如 Weave, Calico, Contiv Netplugin, Cisco, VMware, MidoNet, pipework, flannel等等。
最后
本篇文章主要是讲述Docker网络相关的内容,包括Docker的网络实现、网络创建过程、网络模型组件与优势、网络模式(单节点、多节点)等。
下一篇将讲述Docker的安全。